
Since moving to Chorlton, it’s safe to say my interior design tastes have changed.
Our old home in Northenden was decorated in a more classic style with traditional furniture and colour schemes. But now the once beloved solid oak sideboard/drinks cabinet I brought to Chorlton with me no longer suits the new houses decor, so sadly it had to go.
I’d been looking for a new drinks cabinet to replace it for the past few years. and was really hankering after something with retro/Art Deco features that was a bit of a fixer-upper. I started seaking out local antique villages and vintage fairs, spending (nearly) every weekend browsing for the perfect cabinet I could call my own.
Last year, I found her 🙂

Whilst mooching around Old Mill Antiques in Failsworth, I found this fantastic display cabinet with a concealed writing desk inside for only £60!
Like me she was a little rough around the edges, and bits had started to fall off… but with a little TLC I knew she could be beautiful once more.
There were sadly a few areas on the top of the cabinet where the veneer had chipped off and would have been difficult to repair, so a new lick of paint was on the cards.


clockwise from left: mydomaine.com / urban-home-world ebay.co.uk / futuristarchitecture.com
There are literally thousands of examples of upcycled cabinets online! I’d already started a Pinterest board for drinks cabinet ideas and inspiration; the majority of which featured geometric stenciling, metallics and decorative knobs (hehehe – I’m such a child).
When I first saw the cabinet I fell in love with the fabulous teak veneer finish and didn’t want to loose this completely, so I decided to just paint the frame and leave the doors which were still in very good condition.
Step 1: Preparation
We all know that the right prep beforehand can make the finished result look picture perfect. There are loads of websites, blogs and YouTube videos on how to prep old furniture for upcycling, but for our straight forward paint job we just lightly sanded the frame and made sure the surfaces were cleaned thoroughly ready for painting. We also removed the old dividers inside the writing desk cupboard to create more storage for all our cocktail paraphernalia, and ripped out the old printed-leather insert on the desk.
Step 2: Painting
I wanted the cabinet to fit in with the rest of the dining room decor, so decided to paint the frame with the leftover paint we used on the walls! The grey also helped the teak veneer doors to ‘pop’.

We used a primer as a base, then applied 2 coats of Dulux Once ‘Urban Obsession’ to the frame and shelves inside the two glass-door sections. One coat of lacquer later, and the cabinet was already looking a hundred times better.
Step 3: Finishing Touches
Rather than leave the cupboard doors plain I wanted to add a little Art Deco flourish, but was worried about using something as permanent as paint incase I wanted to change it in the future. The solution: Washi Tape.

I found some gorgeous matte gold Washi tape on Etsy, and added some simple vertical lines originating from a central point on the front of the cabinet. I thought the pattern tied in quite nicely with the parquet herringbone floor (and it was easy to measure & apply – bonus!).
Because the old writing desk was to become a drinks serving area I decided against a new real leather insert on the fold-out door in case of spillages. Instead I opted for a faux-snake skin leather in a stunning silver-grey colour to match the grey frame. There are literally hundreds of faux-leather fabrics available quite cheaply online, in all sorts of weird and wonderful colours so you can quite easily choose a contrasting colour if that’s the effect you’re looking for.

The final addition was a set of stunning gold hexagon door knobs to carry through the art deco theme – they were pricy at £11 each plus delivery, but they were so worth it!
Step 4: Stand Back & Admire (with a glass of bubbly in hand)
In total including delivery & all the materials (though I already had the primer and grey paint leftover from other DIY projects), I managed to spend less than £140 – not bad for a bespoke cabinet! Plus I got an added sense of achievement from breathing new life into an old discarded piece of furniture that just needed someone to see its potential.
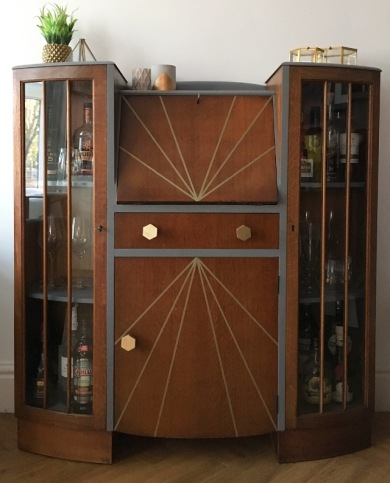
I was first attracted to the symmetry of this piece, and the addition of vertical lines emphasises this feature
I’ll admit I was scared to take on a project like this at first, and there were some ideas that I tried and failed in along the way (I was dreaming if I thought I could hammer tacks around the faux-leather insert in a straight line!), but now the cabinet is completed I can’t wait to get stuck into my next upcycle!
…after a quick tipple from my new bar that is 🙂


Love the makeover! We have two cupboards that we have been meaning to makeover for awhile. This has given me ideas. TFS -jane-
LikeLike
Glad you like it 🙂 There are loads of fab ideas on Pinterest – that’s where I got a lot of my inspiration. You’ll have to let us know how your makeover goes x
LikeLike
I am waiting for you update on making the framed palm. -jane – x
LikeLike
I’ll be posting that tomorrow – just adding the finishing touches today 🙂
LikeLike